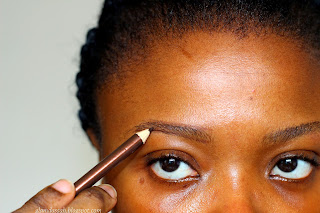
SCULPT YOUR BROWS LIKE A PRO- Detailed Picture Demo,
Well sculpted brows, nicely frame the face giving definition
and instantly changing the look. Your eyebrow technique can make or mar the
appearance of that makeup you have spent hours applying so it’s important to
get your brow game on all the time!
I remember my first experience with grooming my brows. It
was a complete disaster at best such that when my dear father saw me he asked “are
you sick?” Lol! I must have really looked bad. So if you are in this dilemma I
really feel you.
It is worthy of note that thin brows make one look older
while fuller brows give a more youthful appearance to the face.
Here are short easy
steps to getting those nice brows you have always dreamed of.
MATERIALS
Eyebrow brush, spoolie brush
Eyebrow scissors
Tweezers/eyebrow razor
Mirror plus a good light source (what wouldn't I give for a
lighted magnifying makeup mirror for my glasses wearing self sigh!)
STEP 1
On a clean face ensuring eyebrow hairs are free from oil or
brow makeup (powder, gel, pencil etc)
Comb eyebrow hairs upwards and snip over grown hairs with
eyebrow scissors.
Comb eyebrow hairs upwards and outwards to obtain the normal
shape of the brows, removing any stray hairs in the direction of hair growth
using tweezers or eyebrow razor
NB
Work on both sides simultaneously to obtain as much symmetry
as possible. No two brows on a person’s face are perfectly identical however
this can be fixed with brow makeup.
Keep brushing hairs along the desired shape removing
scraggly hairs one strand at a time (careful)! You don’t want to remove too
much hairs at a time so do this carefully you can always go back and retouch if
you are not fully satisfied), now you are good to go
STEP 2
With a well sharpened brown pencil (preferably one shade lighter
than your hair colour), outline the shape of the brow staring from the head
(close to the nose), rising upwards to the peak before dropping to the tail.
Fill in only the tail end with the pencil in short light strokes.
Brush the product through the hairs to distribute it evenly.
you can stop at this stage especially if time constrained or move on to the next step.
STEP 3
Apply concealer (one or two shades lighter than your skin
tone) around the eyebrow, tracing the outline just as you did before with the
pencil on the bottom (and top if you want to) then blend into surrounding skin.
The contrast of the concealer and brow helps to give a more defined, cleaner
and sharper edge to the brows.
This is not a compulsory step you can always stop after
applying just pencil alone to define the brows.
blend out concealer and intensify colour towards the tail of the brow to your satisfaction.Here I used a brow powder.
TIPS
- · Use a mirror that is at a comfortable distance from you and good light source that helps you see well
- · Aim to work with your own eyebrow shape to get a head arch and tail.
- · Grooming is to make your eyebrow hairs neater not to shape them to match someone else’s own!In short, they are your brows! Work them girl!
- · Gently curving brow shapes are best to soften faces with angular features
- · Arched and peaked brows are best to balance the features of people with rounded face shapes.
- practice, practice practice and you will definitely see remarkable improvement! don't get discouraged!
Then go on to finish the rest of your makeup!
Other methods to grooming your brows are threading,
waxing (ouch! Never tried those before though) hair removal by electrolysis- check
that out
How do you groom your brows? what methods have
you used? Do share your experience,
Please leave a comment in the comment section! subscribe so you dont miss any more posts.
Till my next post....
Cheers!
Hadassah


Comments
Post a Comment